You can use the Ascent360 Audience Selector tool to create custom segments of individuals in your database based on their demographics, email history, purchase history, or other behavior. You can then use these audiences to build lists of email addresses, phone numbers or mailing addresses for marketing purposes.
To navigate to Audience Selector, click Audience > Audience Builder from the left-hand navigation menu or directly on the home page.


Before You Begin
You should consider the following when building your audience in the CDP:
- Do I need yesterday’s data?
- Common audiences that require yesterday’s transaction data include post-purchase campaigns and suppressions based on yesterday’s transactions.
- If the audience requires yesterday’s data, you will need to schedule the audience export after your CDP has completed its daily rebuild.
- Ask your A360 contact for your CDP build completion time.
- What is the simplest way to create this audience?
- Simplifying your audience can optimize the time it takes for the CDP to calculate the audience and prevent unnecessary processing time.
- Using the product hierarchy fields speeds up the time it takes for the database to calculate the audience.
- For example, it’s easier for the database to find a single class name, “Subclass Name = Discounted / Promo,” than finding 6 unique product descriptions:

Learn more about using the Product Hierarchy Export to build pristine audiences.
- Do I need specific output fields?
- If your audience export requires specific output fields, the first audience in the complex audience will provide the output fields.
- For example, if you need to export a contact list containing December 23/24 lodging guests with purchased lift tickets and you need the “Product Date” field available in Acoustic, the “Lift Tickets” audience would need to be first on the Complex Audience build, as shown here:

- As the CDP proceeds down the list of criteria in a complex audience, it pulls output fields from the first audience. As lodging and product data is stored and maintained in separate tables, you need to direct the CDP to the data you need.
- If the “Lift Tickets” audience is listed first, this will direct the CDP to the table in which product details are stored and populate the contact list with the most updated “Product Date” field values.
- If the “LOTB December 2324” audience was first, you risk populating the contact list with inaccurate “Product Date” field values as the CDP is directed to the lodging table that doesn’t contain updated product information.
- For example, if you need to export a contact list containing December 23/24 lodging guests with purchased lift tickets and you need the “Product Date” field available in Acoustic, the “Lift Tickets” audience would need to be first on the Complex Audience build, as shown here:
- If you have an export field that's not a default output (or if it doesn’t apply to ALL audiences in your complex audience) your query will run MUCH faster if you create an Advanced Query within Audience Builder to create a single audience vs combining audiences as a Complex Audience
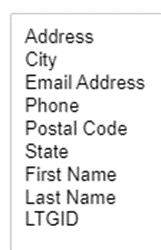
- Default outputs fields include:

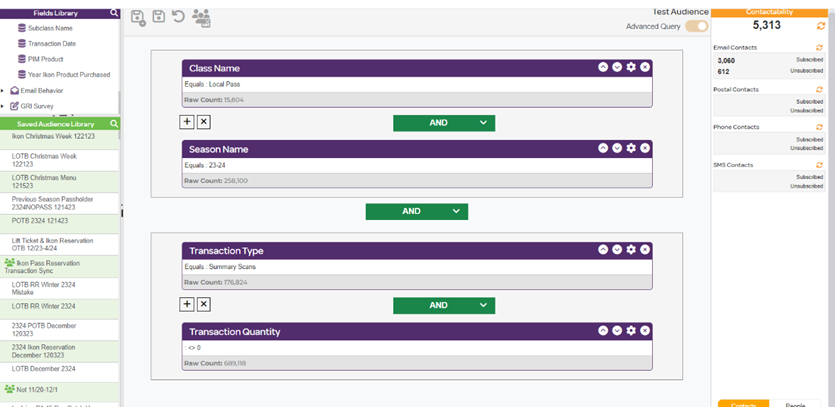
- For example, an audience needs to be exported with the non-default output field “Product Description.” We are looking for any Local Pass holders who have not scanned this season.
- Example of an Advanced Query within Audience Builder:

- Note the distinction. The Advanced Query above is asking the CDP to look for:
- Purchases with “Class Name = Local Pass” for the 23/24 season AND Purchases that have “Summary Scans” not equal to 0.
- The CDP calculated the audience above by calculating the first grouped criteria rather than moving one by one, top to bottom.
- By grouping similar fields together in this way, we help the CDP speed up calculation time.
- We can export this audience with the necessary non-default output field, “Product Description” without using the Complex Audience Builder.
- Learn more here about Advanced Queries.
- Example of an Advanced Query within Audience Builder:
- Default outputs fields include:
- If your audience export requires specific output fields, the first audience in the complex audience will provide the output fields.
Fields Library
Once the Audience Selector tool has loaded, you will see a Fields Library to the left of the canvas. The fields library is a listing of all the fields present in your database. The fields are broken up into folders like Demographics, Purchase History and Customer Attributes to make fields easier to find, but there is also a search feature at the top of the library.

If you hover on a fields’ name, the definition of the field will appear. You can check your data dictionary for more information about the fields in your database.

Configuring Fields
To begin building an audience, choose a field from the fields library and drag & drop it to the audience builder canvas.

Then, select the gear icon to configure your field. This will open your field for configuration. Use the two arrows in the middle of the configuration window to move values from possible values to selected values. Hit the Save button in the right corner of the configuration window to save your selection.


When you save your configuration, the field configuration description displays your selection. Hit the refresh button next to Audience Count to see the individuals tied to your audience. At the bottom of the field configuration box, the raw count of individuals in the database that match your selection is also displayed.

Combining Fields
To create an audience with multiple fields, drag another field into the canvas. By default, the operand between the two fields is AND.

To switch the "AND" to an "OR", select the down arrow on the operator button, then select the operator you would like to use from the drop down. Once you have selected your operator, configure your second field by repeating the steps above.

Refreshing Audience Counts
Once you have created your audience, you can check the count of individuals in your audience by refreshing your audience count. On the audience builder menu, there is a “refresh counts” button that allows you to count the number of individuals your audience contains. Before your audience is refreshed, the count will show as "?". Once you have refreshed, your count will display the number of individuals (unless you have made a different Contactablity selection) who fit the criteria for your audience definition.


Saving Your Audience
Once you are satisfied with your audiences’ configuration, you can save your audience by selecting the Save As button on the top menu. Name your audience something descriptive, and (optionally) write a brief description. Then, click the Save button to save your audience.


